It’s here again… all too short couple of months where “the man” allows us to have Egg Nog.
See more progress on: Extend Egg Nog Season
sharing technical advice, accomplishments and family fun
It’s here again… all too short couple of months where “the man” allows us to have Egg Nog.
Got it into my head shortly after we moved into a house with a bar that a tap would be nice to have. I spent the next 6 months thinking about it, and the last month doing the research into how I could make it happen. Most people purchase completed systems for this sort of thing, or modify an old fridge by sticking a tap through the door. These devices are called kegerators and there is no shortage of images of them on the internet.
My first thoughts were to modify the existing fridge under the bar – but it’s a pretty nice fridge and I realized I’m still going to want some cold beverage storage at the bar.
I found an Internet forum of people who discuss these systems and dole out tons of advice to noobs like myself.
A few days searching on craigslist and I found a pretty standard old fridge for the project, sold by a guy right around the corner from us. I brought this home and got a keg in it to make sure my CO2 system still worked.
Next I started to drill the holes in this fridge. I could not find a diagram of where the coolant lines were inside the old fridge – but my drill bit found one. A loud HISS and the fridge was garbage. It’s possible to repair a coolant line and recharge the coolant system – but it would end up costing about 5 times what I paid for the fridge. So, that fridge is garbage now. So much for this being a “green” project.
This crisis however turned into a beautiful opportunity. While killing the fridge I was doing more reading online and decided that a chest freezer was probably a better choice for the system. Craiglist to the rescue again – a little further away this time – but I acquired a Kenmore C675 freezer with I think a 13 ft^3 capacity. It will easily hold 3 kegs + CO2 tank vs. the old fridge only holding a couple.
I spent a night drilling holes in the bar and floor and garage ceiling. Had to cut out more than I planned on becuase my 2.5 inch drill bit wasn’t close to long enough for the whole job. This was probably a good thing as I was able to explore what was in the various layers between the bar and the garage before drilling through them.
I convinced my friend Chris to come help on a Thursday night – he’s very willing to help with beer related projects – and we assembled the various parts of the system in one night with only a single additional trip to Home Depot.
The main design goal of the system aside from delivering carbonated beer to the tap is to keep that beer cold all the way to the tap. If it gets warm in the lines it will come out as foam and then settle into flat beer. There are a couple of ways to do this – the expensive way: coolant lines and a compressor in the fridge, and the cheap way: a blower motor blowing cold air from inside the fridge up a pipe with the beer lines in it. I chose the cheap way.
Here’s the freezer chest in the garage under the bar:

There’s a 2inch PVC pipe coming out the side insulated with foam. The 2×4 skirt around the top is there to raise the lid a little (some homebrew kegs are to tall) but mostly to avoid having to cut into the freezer – which I was more than happy not to do.
Inside the freezer are the kegs and the CO2 system:

There’s a blower motor attached to a blower hose that goes up into the 2in PVC pipe. The beer lines go inside this blower hose. The blower pulls cold air from in the freezer and blows it up the hose alongside the beer lines. This air goes to the tap on top and then returns to the freezer on the outside of the blower hose inside the PVC pipe. There’s a little spill in the freezer from a mistake I detail below, and I plan to clean it all out after I kick these two kegs.
There are two lines run up to the taps – but I only have one D coupler (keg tap) so I only have one beer online at the moment.
The interface between the freezer and the outside world:

Here we see the external thermostat – becuase beer is very sensitive to temperature and the freezer doesn’t have a setting warm enough for beer.
Inside the tap tower:

Here is where a mistake was made – I used a thin walled hose to deliver the beer initially (all they had at Lowes) and it leaked. The hose clamp just wasn’t able to get a good seal no matter how tight it was. So when we first turned it all on the beer leaked back down the hose all the way down into the blower motor. A quick trip to Home Depot and I got 20ft of nice thickly walled 1/4″ hosing. This new hose sealed perfectly.
The finished project:
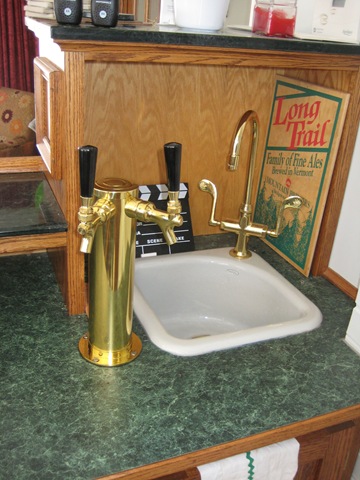
There’s probably a drip tray in my future – and I’m currently running the beer through 20ft of hose. The advice is to get the hose too long and shorten it to get the flow rate you want. It’s currently pouring a little slow, but there’s very little foam and I’m afraid to mess with it. There are also probably some tap handles in my future.
We had some folks over for my son’s bday party and the tap worked perfectly. Spent a lot of time outside with the kids this weekend as well and it got me thinking of having a quick-change tap system to dispense beer inside the freezer.
All in all – it was a lot of plumbing and the biggest thing I would have done different was to get the right hose from the start. I also will probably seal up/insulate the 2×4 skirting a little better as it get’s warmer – but currently the outside temp is colder than what I want inside the freezer.
I also need a name for the whole thing.
Cheers!
I’ve decided that a small crack in the tyrany that is the restriction of egg nog might be made by getting people to serve it at their superbowl parties – and thus encourage the distributors to extend how long they make it available in the stores.
In other news – I have aquired a few recipes for egg nog to extend my personal egg nog season.
Yea, though I walk through dairy isle,
I shall fear no soy products.
For mine is the Nog,
with the Rum and the Nutmeg.
M@
And that’s all I have to say about that.
 Had some fun making bread with the family – getting the kids (et.al.) very messy kneading the dough in flour.
I decided to make the bread while driving, and just went to the store planning on finding the recipe on the back of a bag of flour or on the yeast packet. Unfortunately they all had complicated bread like pumpkin bread, or oatmeal bread.
I kinda wanna learn the real chemisty behind making bread so I don’t always have to consult a recipe. I’ve accomplished this for chili, and now want to add bread to the repertoire. This repertoire idea was inspired by my oldest sister who can make chocolate chip cookies without reading a recipe.
I found this recipe online, and it comes close – but the one the flour bag listed eggs and butter, so I improvised a bit and added a couple tablespoons of butter and an egg. SuzShe warned that messing with a bread recipe would make it fail to rise.
My bread rose just fine – easily doubling in volume. I planned a little poorly and didn’t want to cook it that night because everyone would be in bed when it was done – and the best part of baking bread is eating it right out of the oven. So I put it in the fridge after it rose. It rose a little more in the fridge, then the top got a little hard – dried out. It wasn’t much, but another day in the fridge would’ve ruined it I’m sure.
Here’s what I ended up with for a recipe:
Next time I’ll try more butter and maybe more sugar. I think the key to the rise is the yeast + warm water + sugar, based on my home brewing experiences.
I’ve read in a couple places that keeping track of what you eat is a good way to loose weight and improve the quality of what you eat. So I’m going to try to keep a food diary. I’m going to do it here, in the blog. I thought that maybe this wasn’t the best place – but if I tag everything with “food” it should be easy for readers to ignore – or for me to remove all the posts to a different blog at a later date.
We’re moving in a couple of weeks to a house with oil heat – which has me worried about heating costs. I’d like to be able to manage the heating of the house via a climate server that has internet access.
The mimimul functionality this server will need is temperature readings from various parts of the house and control over the furnace valves that control where the heated water goes that heats these areas.
The next level of complexity comes with a weather monitoring station with data available to the server (like this one) that can provide exterior temperature information. I would like to use this to predict how much it will cost to keep the house at a specific temperature on a specific day.
The server will surely be online – with access to forecast model predictions of expected temperatures. I would like to use this in the modeling of the household environment and predicting heating costs.
Another layer of complexity comes in with the central air conditioning system – which has two compressors outside the house. Balancing these two units such that the optimal cooling is achieved would be something I would like to monitor and control on the server.
Eventually I like the whole thing to be driven not by a clock (morning vs. night), or even a weekly schedule (weekend vs. weekday) – but to be tied directly to the family calendar, such that heating and cooling needs are specifically spelled out – and a house based use case like:
Would be stacked up against a hypothetical weather forecast
Would be balanced with the
And could potentially not just control the heating and cooling systems with control outputs like
And the data would be presented in such a way we could see things like
And the really advanced piece of programming would spit out things like:
I’d also like the system to warehouse data, so I can perform query’s that might tell me that running an electric space heater in my new office will be more efficent than burning oil. I will definatly be interesteed in how much a pellete burning stove could save on our heating – but only after knowing how our daily heating needs fluctuate. What I’d really like to produce is data supporting a geo-thermal heating system.
Pie-in-the-sky uses include having our family menu detail if we are sitting in the dining room, the kitchen island or (gasp) eating in front of the TV and controlling the interior climate appropriatly.
And now I must pack the garage.
Our house is exactly 1 mile from the Budwiser brewery in Merrimack, NH. I’m a little bit of a beer snob – preferring Long Trail, Magic Hat, Harpoon et. al. to the standard “beers of the proletariat.” I’m also a home brewer in waiting (30+ batches under my belt, but 0 in the past 5 years.)
That being said – I am going to miss being able to enjoy the smell of brewing beer on a regular basis. I believe it would be a challenge for most brewers to tell the difference between the smell of budwiser brewing and their own special recipe for custom IPA.
Especially as of late, driving home in the Jeep with the top down, I can smell the brewery well over a mile from our house, and it brings a smile to my face. It also often makes me consider how much beer is currently in the fridge, often prompting a stop at the store.
Brewing Beer smells like a high quality cereal or oatmeal, both fresh and toasty. It’s a very distinctive smell with a hint of molasses and maybe a shade of chocolate.
When we bought this house I studied the area around it – to great detail. I had the local airports approach and departure paths mapped out, I knew the prevailing wind direction, I knew the zoning of all land within 10 miles of my property… and a distinct factor in that information was the “1 mile from a brewery” question. At the time I was worried about it, but was reassured that the brewery was to the east of my house, and the prevailing wind from the west. Little did I know how I would come to love the days when the wind blew from the other direction.
Had to get some cheap red wine for the chili – and picked up a couple “okay” bottles as well, and by “okay” I am rating purley on price at this point. Once back home I arranged it so I had 3 glasses with labels on the bottom that I couldn’t see. I mixed them up, then had SuzShe mix them up and we tasted each and took some notes. Our opinions were for the most part identical. The real game was “which is the cab” – and we both failed. We both knew what 3 wines we were tasing, but not what glass held which. Here are the results.
| Property | Wine 1 | Wine 2 | Wine 3 |
| Legs | Good Legs | No legs | Legs |
| Nose | Acid – Strong | Mild/Smooth | Very Mild |
| Mouth | Even from start to finish | different in the middle, but smooth/even overall | a distinct middle taste |
| Swish | dry | even | even |
| Favorite | SuzShe:3 M@:2 |
SuzShe:2 M@:3 |
SuzShe:1 M@:1 |
| Wine | Kendal Jackson Merlot 2004 $17.99/750mL(bottle) |
Yellow Tail Cabernet Sauvignon 2006 $14.99/1.5L ($7.50/bottle) |
Turning Leaf Merlot 2006 Reserve $6.99/750mL(bottle) |
Results weren’t really definitive, except perhaps the order. It got me thinking that if I could devise a system for tasting 2-3 wines at a time and arranging them in order – I could use the results to have a complete list of how the wines compare to my taste. Always having 2 or 3 “standards” that most wines fall around – the complete list could be ordered with a high degree of accuracy. This is something I must discuss with “The Doctor.” It could lead to “adjustment tastings” where wines that aren’t fitting with the statistics are rated in a special tasting.
I was about to use the wine chiller to get them to the right temperatures – but the Yellow Tail came in a big bottle that wouldn’t fit in the chiller. I am, however, chilling the Kendal Jackson as I type this.
